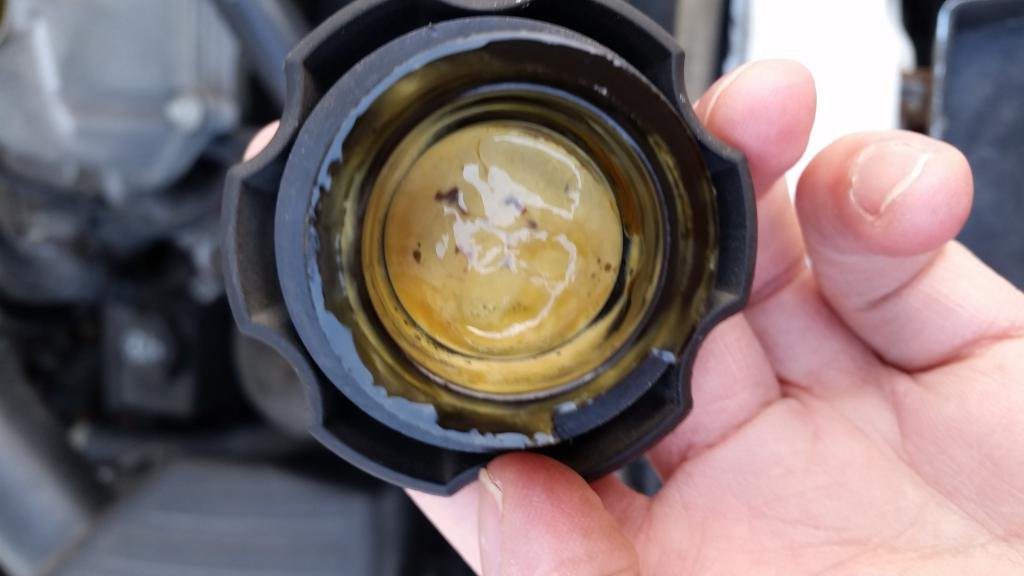
The importance of engine oil in every vehicle can never be overemphasized. Without engine oil, there would be excessive friction in engine moving components, causing overheating and subsequent car engine breakdown. Hence, monitoring your engine oil’s condition is paramount in ensuring your car runs smoothly. Ever noticed a milky texture in your engine oil? This is a bad sign.
Milky oil should never be overlooked as it hampers the health of your vehicle. If you are wondering how to flush the milky oil from your car engine, rest assured that the solution you seek will be provided in this article. We will cover everything you need to know about milky engine oils, their causes, their hazards, and how to flush milky oil from your engine.
Now let’s dive in properly.
How To identify Milky Oil
A milky oil is an oil that appears cloudy or opaque rather than clear. This can occur when water or other impurities are mixed in with the oil. In some cases, milky oil can indicate a problem with the engine or other mechanical components.

8 Common Causes Of Milky Oil
There are many causes of milky oil in your engine. Most of these causes come from damaged or worn-out parts. In this section, we will look at each of the various causes in detail.
1. Leak In Engine Cooling System
The most common cause of milky oil is a leak in the engine’s cooling system. When coolant leaks into the oil pan, it can mix with the oil and create a milky appearance. This can happen due to a cracked head gasket, a damaged cylinder head, or a faulty oil cooler.
2. Condensation in the Engine
Another common cause of milky oil is condensation. When your vehicle is parked and unused for a long time, the engine oil can cool down and collect moisture. This moisture can then mix with the oil, creating a milky appearance. This is more common in vehicles driven infrequently or parked in humid environments.
3. Poor Oil Maintenance
A third cause of milky oil is poor maintenance. If you don’t change your oil regularly, it can become contaminated with dirt and debris, leading to a milky appearance. Additionally, using the wrong type of oil for your vehicle can lead to milky oil.
4. High Engine Temperatures
When the engine runs at high temperatures for extended periods, it can cause the engine oil to break down and mix with water. This can be caused by some factors, such as a faulty thermostat, a clogged radiator, or a malfunctioning water pump.
5. Damaged Oil Coolers
This component is responsible for keeping the oil at the correct temperature, but if it’s damaged or clogged, it can cause the oil to become milky. This is particularly common in vehicles that are driven in extreme conditions or that have a lot of miles on them.
6. Overfilled Oil Pan
When the oil level in the pan is too high, it can cause the oil to foam and mix with air, which can lead to a milky appearance. This is typically caused by mistakes during an oil change, such as using too much oil or not properly checking the oil level.
7. Use Of Incorrect Oil Filters
Oil filters prevent dirt and debris from entering the engine oil. If the filter is not the right size or not designed for your vehicle, it can cause the oil to become milky. The filter is designed to remove contaminants from the oil, but if it’s not the correct size or type, it can’t effectively do its job.
8. Other Potential Causes
In addition to the above causes, it’s important to note that milky oil can signify a more serious underlying issue. For example, if the oil is milky and the coolant level is low, it could indicate a cracked engine block. Therefore, if you notice milky oil, it’s essential to have your vehicle inspected by a professional mechanic as soon as possible.
How To Prevent Milky Oil
To prevent milky engine oil, it’s essential to take good care of your vehicle’s cooling system. This includes checking for leaks, replacing damaged parts, and regularly checking the coolant level. You should also make sure to change your oil regularly and use the correct type of oil for your vehicle.
Additionally, if you’re storing your vehicle for an extended period of time, make sure to use a quality oil stabilizer to prevent condensation.
Step By Step Guide On Flushing Milky Oil From Your Engine
Flushing milky oil from your engine is an important step in maintaining the health of your vehicle. If left untreated, milky oil can cause severe damage to your engine and lead to costly repairs. Flushing milky engine oil can be a simple process once you have the right tools and understand a few tricks.
Here’s a step-by-step process to guide you in adequately flushing milky engine oil from your car.
Step 1: Gather the Necessary Tools and Supplies
You’ll need a new oil filter, oil drain plug gasket, oil pan gasket, oil filter gasket, oil filter wrench, and a new oil drain pan.
Step 2: Raise Your Vehicle
You’ll need to raise your vehicle off the ground to access the oil pan. Use a jack or a set of jack stands to raise the vehicle. Before you begin, ensure you have a level surface to work on, and always follow the manufacturer’s instructions when using a jack or jack stand.
When using a jack, place it on a solid surface, and never use it on soft ground or loose gravel. Always use the designated jack points on your vehicle.
Step 3: Drain The Oil
Remove the oil drain plug from the oil pan and allow the oil to drain into the oil drain pan. Use the correct size wrench or socket to remove the oil drain plug and avoid stripping the threads. It’s also important to note that some vehicles may have a magnetic drain plug designed to collect metal particles from the oil. In this case, clean the magnetic drain plug before reinstalling it.
Once the oil has drained, it’s important to dispose of the old oil properly. Old oil can be harmful to the environment if not disposed of correctly.
Step 4: Replace Components
Remove the old oil filter and replace it with a new one. Be sure to use the correct oil filter for your vehicle. The drain plug gasket and oil pan gasket should also be replaced.
Step 5: Refill The Oil
Use the correct oil for your vehicle and fill the oil pan to the proper oil level. Proper care should be taken to avoid overfilling it, as doing so will bring back the problem of having a milky oil.
Step 6: Start The Engine
Start the engine and let it run for a few minutes to circulate the new oil.
Step 7: Check the oil level
Check the oil level with the dipstick and add more oil if necessary. Check the oil level after the engine has been running for a few minutes to ensure an accurate reading. The oil level should be between the “full” and “low” marks on the dipstick. If the oil level is low, add more oil until it reaches the proper level.
Step 8: Check for Leaks
After you’ve completed the oil flush, take a few minutes to check for any leaks. Look for any signs of oil leaks around the oil drain plug, oil filter, and oil pan gasket. If you notice any leaks, it’s essential to address them immediately to prevent further damage to your engine.
Step 9: Test Drive Your Vehicle
Before you put your vehicle back on the road, take it for a test drive to ensure everything is working correctly. Check for any unusual noises or vibrations, and pay attention to the oil pressure gauge to ensure it’s reading correctly.
Consequences Of Not Fixing A Milky Oil
If milky oil is not fixed, it can lead to negative consequences. A healthy oil should be clear and amber in color, but if it starts to look milky, it could be a sign of a serious issue. In this section, we will explain in detail the consequences to expect if you should ignore fixing a milky engine oil.
Risk Of Engine Corrosion
The presence of milky oil in your engine might indicate water contamination. A leaking head gasket or a cracked engine block might cause water contamination. When water gets into the oil, it can lead to rust and corrosion in the engine. This will eventually cause damage to internal engine components and reduce the engine’s efficiency.
Engine Overheating
Another causative factor to milky oil is the presence of engine coolant in the oil. This indicates a leak in the engine cooling system. When the engine coolant leaks, you can expect your engine to overheat. An engine overheating can lead to further cost-intensive problems.
Increased Friction
A car engine is made up of several constantly moving components that require enough lubrication to reduce friction. When your engine oil turns milky, you can expect a decline in its lubricating properties. The resulting problem is increased friction, further leading to loss of power and overheating. It can also cause a complete engine breakdown in critical cases.
Conclusion
Flushing milky oil from your engine ensures that your vehicle runs smoothly and efficiently. Keep in mind that this process is a preventative measure. If a more serious underlying issue causes the milky oil, it’s essential to get it checked by a professional mechanic before proceeding with flushing.
Additionally, it’s essential to keep up with regular oil changes and always to use the correct type of oil for your vehicle to prevent milky oil from occurring in the first place. I will see you at the next one.
FAQ’s
Is it safe to drive with milky oil in the engine?
Driving with milky oil is permissible. Short trips will have little influence on your engine. However, using milky oil for an extended period can cause problems. Improper lubrication of moving parts will cause various issues for the engine.
What causes milky oil in the engine?
Milky oil can be caused by coolant leaks, high engine temperatures, condensation in engines, and faulty components, amongst others. Milky oil indicates that something might be wrong with your vehicle’s engine. Faulty components should be diagnosed and replaced to avoid damage to your vehicle.


