
Has your dashboard ever displayed an orange or yellow light that resembles an engine? One of your car’s most crucial warning lights is this one, which goes by the name of “check engine light.” It alerts you to the fact that there is a problem with your engine or any associated systems, and you must act to resolve it.
The Diagnostic Trouble Code (DTC) Universe

We must first comprehend the meaning of the check engine light before we can begin to reset it. Instead of being a precise indicator of a single issue, the check engine light is a generic indicator of several potential issues.
The engine control unit (ECU), a computer that manages the engine and its associated systems, keeps an eye on a number of sensors and parameters to make sure everything is operating as it should.
When it notices an issue, it records the type and location of the issue as a code in its memory. The ECU communicates with you using this code, which is known as a diagnostic problem code (DTC).
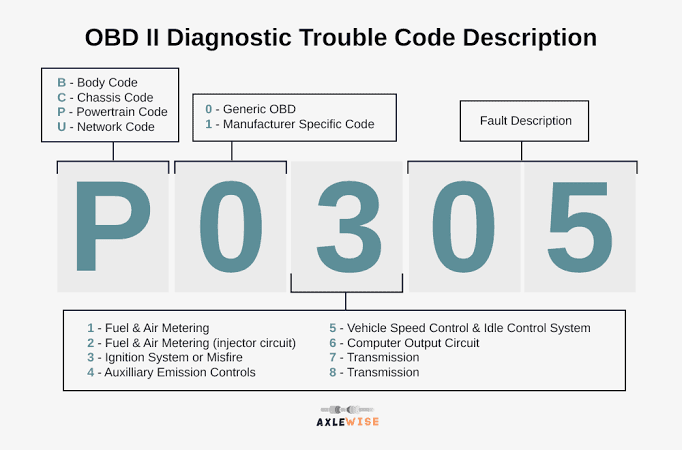
There are countless DTCs that may exist, and each has a unique format and purpose. A DTC, like P0300, usually consists of a letter and four digits. The impacted system, such as the powertrain (P), chassis ©, body (B), or network (U), is indicated by the letter. The type of problem—generic (0), manufacturer-specific (1), or enhanced (2)—is indicated by the first digit.
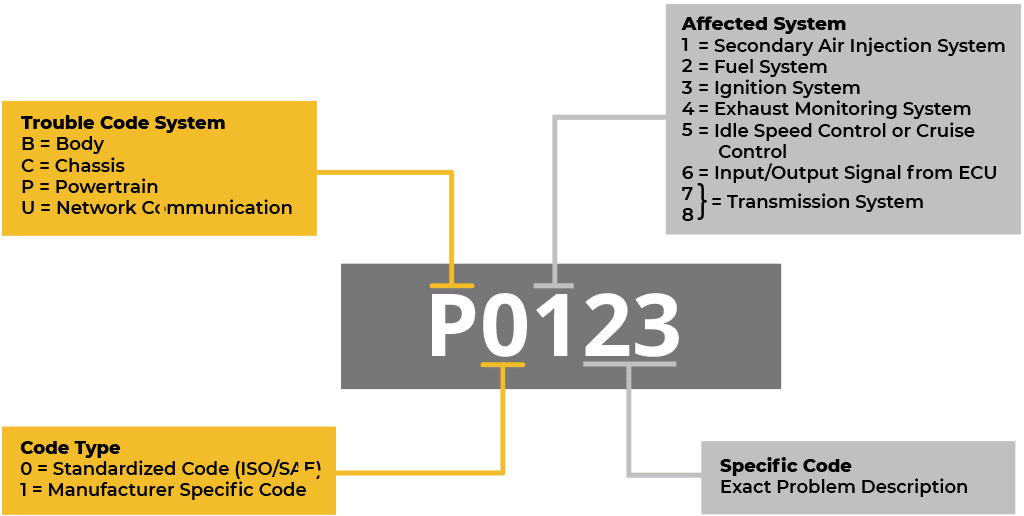
The afflicted subsystem, such as the fuel and air metering (1), ignition system (3), or gearbox (7), is indicated by the second digit. The final two digits identify the particular part or issue, for example, oxygen sensor (02), throttle position sensor (11), or cylinder misfire (00).
An instrument known as a scan tool is required in order to extract the DTCs from the ECU. The OBD-II port on a car is a standardised diagnostic connector that is often found under the dashboard.
A portable device called a scan tool can connect to this port. The scan tool can read the DTCs from the ECU and show them on its screen once it is connected. While some scan tools allow you to check up the meanings online or in a manual, others may also provide definitions and potential explanations for the DTCs.
You can pinpoint the precise part or system that is triggering the check engine light by interpreting and decoding the DTCs. In addition to saving you time and money on needless repairs, this can assist you in reducing the number of potential causes and solutions. Remember, though, that DTCs are not always definitive and that additional testing and diagnosis by a trained mechanic may be necessary for some issues.
How to Reset the Check Engine Light: A Comprehensive Guide
It could be helpful to reset the check engine light to turn it off once you have located and resolved the issue that is causing it to illuminate. The check engine light on an automobile can be reset in a few different ways, based on the kind of car and the tools you own. Here are three typical approaches that you can attempt:
Technique 1: Making Use of a Scan Tool

Using a scan tool is the quickest and most dependable way to reset the check engine light. As we previously discussed, a scan tool can communicate with the ECU by connecting to the OBD-II port on the car. A scan tool has the ability to read DTCs as well as remove them from the ECU’s memory, which will reset the check engine light.
The actions to take are as follows:
- Attach the scan tool to the OBD-II port on the car. Usually, the port is situated next to the steering wheel, beneath the dashboard. You might have to consult your owner’s manual to determine the precise location.
- Activate the scanning tool and choose the “Reset Check Engine Light” menu item. This option may be referred to by different titles in the scan tool, such as “Clear Codes,” “Erase Codes,” or “Reset ECU.”
- To finish the reset procedure, adhere to the scan tool’s instructions. Turning the ignition key to the “On” position without starting the engine is one of the two options the scan tool may ask you to confirm. Subsequently, the scan tool will reset the check engine light and remove the DTCs from the ECU’s memory.
- Disconnect the scan tool from the OBD-II port and turn it off. Check to see if the check engine light has gone off after starting the vehicle. You’ve reset it successfully if it has. If not, there might be another issue that has to be resolved or your car might not be compatible with the scan tool.
Technique 2: Unplugging the battery

Resetting the check engine light can also be accomplished by disconnecting the battery. The primary power source for the electrical system of the car, which includes the ECU, is the battery.
You can turn off the power to the ECU and reset its memory, which will also disable the check engine light, by unplugging the battery. Nevertheless, there are many disadvantages to this method, like losing your clock settings, radio presets, and other customised features.
It might also cause other warning lights to come on, including the airbag or anti-lock brake system (ABS) lights, which might need to be reset with further steps.
The actions to take are as follows:
- Make sure the car is parked safely and with the engine off. For further safety against sparks and injury, you might want to wear gloves and goggles.
- Find the battery terminals and start by unplugging the negative terminal. The positive and negative battery terminals are typically identified by a “+” and a “-” sign, respectively. Typically, a black wire is connected to the negative terminal and a red wire is attached to the positive terminal. To remove the terminal from the battery post, first loosen the nut or clamp holding it in place with a wrench or pliers. A short circuit or shock could result from using the wrench or plier to touch the positive terminal or any other metal element.
- A thorough discharge of the vehicle’s electrical system will take about thirty minutes. This will guarantee that the check engine light is reset and that the ECU’s memory is cleared.
- In reverse sequence, reconnect the battery terminals. The positive terminal should be used first, followed by the negative terminal. Verify that there are no loose or corroded connections and that the terminals are firmly fastened to the battery posts.
- Check to see if the check engine light has gone off after starting the vehicle. You’ve reset it successfully if it has. If not, the battery might not have been detached for long enough, or there might be another issue that has to be resolved.
Technique 3: Reversing the Ignition

Cycling the ignition is the third way to reset the check engine light. This technique involves repeatedly rotating the ignition key to the “On” and “Off” positions in an attempt to fool the ECU into wiping the check engine light and resetting its memory. This approach might not be effective for many cars, though, and it is not very dependable. It might also result in problems with the fuel pump or the car’s security system.
The actions to take are as follows:
- Make sure the car is parked safely and with the engine off.
- Without turning on the engine, turn the ignition key to the “On” position. The dashboard lights illuminate but the engine does not start when the ignition switch is in the “On” position, which is often the second position.
- Replicate turning the ignition key to the “Off” position. The dashboard lights turn out and the key can be withdrawn when the ignition switch is in the “Off” position, which is often the first position.
- Do steps 2 and 3 three times in total. This will finish the ignition cycle for one.
- Check to see if the check engine light has gone off after starting the vehicle. You’ve reset it successfully if it has. If not, there can be another issue that needs to be resolved or there might have been an error in the ignition cycle.
Interpreting the Reappearance of the Check Engine Light
Resetting the check engine light just resolves the diagnostic code; it does not address the underlying problem, regardless of how you choose to do it. The check engine light indicates an issue; it is not the issue itself. It is possible that the check engine light will reappear eventually if the underlying problem is not resolved. This could result in more harm to your car and higher costs for you.
Therefore, before trying to reset the check engine light, it’s crucial to address the underlying issue. The DTCs can direct you towards potential causes and fixes, but in order to be sure that the issue is real, you might also need to conduct some more testing and diagnosis. Seek expert assistance from a trained mechanic if you are unsure how to proceed or if the issue is too complicated for you to handle. In order to identify and resolve the issue and guarantee the safety and dependability of your car, a mechanic might employ increasingly sophisticated equipment and methods.
Conclusion
The most crucial thing to keep in mind is that the fundamental problem is not resolved by resetting the check engine light. The check engine light is not the cause; it is a symptom. If the underlying reason of the check engine light is not resolved, it is likely to reappear and cause other issues for your car. Therefore, before attempting to reset the check engine light, it is imperative to address the underlying cause of the problem. The diagnostic trouble codes can lead you to potential causes and solutions, but further testing and diagnosis may be required to validate the issue. Seek expert assistance from a trained mechanic if you are unsure how to proceed or if the issue is too complicated for you to handle.


